
Moving to a new home is an exciting journey, but it can also be a bit stressful, especially when you have cherished artwork to transport. You want to ensure that your artwork arrives at your new destination safely and in the same condition as it left. In this guide, we'll explore the best way to wrap a picture frame and creative photo frame packaging ideas. Whether you're an art collector, a homeowner with valuable paintings, or a photographer with precious prints, we've got you covered. Discover the expert tips and solutions NoBroker offers to make your move worry-free.
Understanding the Value of Proper Packing
Proper packing is indeed crucial when it comes to safeguarding artwork during a move. Whether you're a professional artist, a collector, or simply moving your art collection from one place to another, here are some key reasons why proper packing is essential:
Recommended Reading
Shoes Packaging Ideas: Decluttering, Pac...
7.1K Views
Dec 26, 2023
How to Pack Kitchen Items for Moving - S...
6K Views
Jan 31, 2025
How to Pack Your TV For Moving Safely St...
5.7K Views
Jan 31, 2025
The Best Way to Wrap a Picture Frame: Co...
5.7K Views
Oct 25, 2023
Best Way to Pack a Mattress for Moving W...
5.6K Views
Oct 23, 2023
- Protection from Physical Damage: Artwork can be fragile and susceptible to various forms of physical damage during a move. Proper packing, which includes using appropriate padding, cushioning, and sturdy containers, helps protect artwork from impacts, jolts, and rough handling. This is especially important for delicate or valuable pieces.
- Protection from Moisture: Moisture can be a major threat to artwork. Exposure to moisture can lead to mould, warping, and discolouration of paper-based art, while it can cause canvas paintings to stretch or warp. Proper packing materials and techniques create a barrier against moisture, reducing the risk of damage.
- Protection from Environmental Factors: Artwork is sensitive to changes in temperature and humidity. Fluctuations in these environmental factors can lead to warping, cracking, and deterioration of art. Proper packing can include insulation and moisture-resistant materials to mitigate the impact of these factors.
- Preventing Dust and Debris: Dust and debris can accumulate on artwork during a move, and if not properly protected, they can be difficult to clean off, potentially causing damage. Using protective covers and wraps can prevent dust and debris from settling on the artwork.
- Secure Transportation: Proper packing not only safeguards the artwork itself but also ensures it remains securely in place during transportation. This minimizes the risk of the artwork shifting or moving within its packaging, which can cause damage.
- Ease of Unpacking and Display: Proper packing isn't just about protection; it's also about convenience. Using well-organized and labelled packing materials makes it easier to unpack and set up your artwork in your new location, saving you time and reducing the risk of mishandling during unpacking.
- Peace of Mind: Knowing that your artwork is properly packed provides peace of mind. This allows you to focus on other aspects of the move without worrying about the condition of your precious art pieces.
Preparing Your Artwork
- Preparing your artwork is a critical preliminary step before packing it for a move. Proper preparation ensures the artwork's integrity and minimizes the risk of damage during the relocation. Here are important steps to follow when preparing your artwork:
- Cleaning: Before packing, carefully clean your artwork. Dust, dirt, and other contaminants can accumulate on the surface, which, if left uncleaned, can become trapped under packing materials and potentially cause damage over time. Use appropriate cleaning techniques for the specific medium:
- For framed works under glass: Use a soft, lint-free cloth to gently wipe the glass and the frame. Avoid using cleaning solutions that could damage the art or its frame.
- For unframed works: Be cautious with cleaning, as some mediums like pastels or charcoal can smudge. You may want to consult with a conservator for advice on cleaning specific types of art.
- Documentation: Before packing, document your artwork. This documentation is crucial for tracking and verifying the condition of your pieces. Create a detailed inventory that includes photographs, descriptions, dimensions, and any existing damage or imperfections. This serves as a reference point to ensure the artwork remains intact during the move. Consider creating a digital copy of this inventory for added security.
- Assessing Condition: Carefully inspect your artwork for any pre-existing damage or vulnerabilities. This step helps you identify if any repairs or additional protection are needed before packing. If you discover any damage, consider consulting a professional conservator to address the issues properly.
- Disassembling and Removing Hardware: If your artwork has removable components, such as frames or mounts, consider disassembling them to prevent damage during transportation. Store these components separately and securely label them for reassembly at your new location. Remove any hanging hardware, and pack it with the artwork.
- Protective Measures: Use appropriate protective measures based on the type of artwork:
- For framed artwork: Cover the glass or acrylic surface with a protective layer, such as glassine paper or plastic sheeting, to prevent scratches or damage during transport.
- For unframed artwork: Use acid-free tissue paper or glassine paper to protect the surface. For larger pieces or canvases, consider using protective corner protectors.
- Padding and Support: Ensure that your artwork is adequately padded and supported within its packaging. Use cushioning materials like bubble wrap or foam to protect the artwork from shocks and vibrations during transportation. Make sure the artwork is snug within its packaging but not overly compressed, as excessive pressure can cause damage.
- Labeling: Clearly label each artwork package with the artist's name, title of the piece, and any handling instructions. This helps movers or handlers understand the value and fragility of the contents.
- Climate Control: If your artwork is sensitive to temperature and humidity, consider climate-controlled transportation or storage options. Extreme conditions can harm artwork, so take precautions if your pieces are particularly susceptible.
Choosing the Right Packing Materials
Choosing the right packing materials is essential to protect your artwork during a move. Quality packing materials can provide the necessary cushioning, support, and protection to ensure your artwork remains intact. Here are some common packing materials to consider and tips for selecting them:
- Artwork Packaging Boxes: When packing framed or unframed artwork, it's essential to use appropriate-sized boxes. You can find photo frame packaging boxes specifically designed for artwork. These boxes are typically thicker and provide extra protection. Ensure that the box is large enough to comfortably accommodate the artwork with some padding, but not so large that it allows the artwork to shift inside. You can often find such boxes at art supply stores or speciality packing stores.
- Packing Tape: Invest in high-quality packing tape to secure the packaging. Heavy-duty packing tape with strong adhesive is recommended. Make sure the tape is wide enough to provide a secure seal.
- Bubble Wrap: Bubble wrap is an excellent cushioning material for protecting artwork. Wrap the artwork in several layers of bubble wrap, particularly focusing on corners and fragile areas. You can also use anti-static bubble wrap to prevent static electricity from damaging delicate surfaces.
- Foam Inserts: Foam inserts are useful for creating a snug fit inside the packaging box. You can use foam sheets or custom-cut foam inserts to provide additional protection and prevent the artwork from shifting during transportation.
- Glassine Paper: Glassine paper is a non-abrasive, acid-free paper that is ideal for protecting the surface of artwork, especially pieces with glass or acrylic glazing. It prevents sticking and potential damage to the artwork's surface.
- Acid-Free Tissue Paper: Use acid-free tissue paper to protect delicate or sensitive surfaces, such as prints, drawings, and watercolours. It helps prevent acid migration and deterioration of the artwork.
- Cardboard Corner Protectors: These are especially useful for protecting the corners of framed artwork. They prevent chipping and damage to the frame's edges.
- Plastic Sheeting or Stretch Wrap: You can use plastic sheeting or stretch wrap to create a moisture-resistant barrier around the artwork. This is particularly important for protecting against humidity and moisture during transit.
- Labels and Markers: Clearly label each package with information about the artwork, including the artist's name, title of the piece, and any handling instructions. You can also use labels to indicate the top of the artwork to ensure it's handled correctly.
- Custom Crates: For exceptionally valuable or fragile artwork, custom crates may be the best option. These are specially designed containers that provide the highest level of protection. Professional art handlers can assist in creating custom crates.
The Art of Packing
Packing artwork properly is an art in itself, and it's essential to take special care when handling different types of artwork. Here are step-by-step instructions on how to pack various types of artwork, including paintings, sculptures, and framed prints:
Packing Paintings
- Gather Materials: You'll need a photo frame packaging box or a custom-sized box, bubble wrap, acid-free tissue paper, glassine paper, foam inserts, and packing tape.
- Clean and Document: Clean the painting carefully as mentioned in the previous sections. Document its condition and take photographs.
- Wrap in Glassine Paper: Cover the painting with glassine paper to protect the surface. Ensure the glassine is larger than the artwork.
- Layer with Bubble Wrap: Wrap the glassine-covered painting in several layers of bubble wrap. Pay extra attention to corners and edges, as these are vulnerable areas.
- Secure in Foam Inserts: Create custom foam inserts to fit the artwork snugly within the packaging box. These inserts should provide a cushioned and secure fit.
- Place in Box: Carefully place the wrapped and protected painting inside the photo frame packaging box. Add additional cushioning materials to fill any gaps.
- Label and Seal: Label the box with the artwork's details and handling instructions. Seal the box with packing tape securely.
Packing Sculptures
- Gather Materials: You'll need a suitable crate or box, bubble wrap, foam padding, packing tape, and custom packaging materials (such as foam or sculpting clay for support).
- Clean and Document: Clean the sculpture as needed and document its condition.
- Wrap and Protect: Wrap the sculpture in multiple layers of bubble wrap, ensuring that delicate parts are well-padded. For sculptures with protruding or fragile elements, use sculpting clay to create custom support.
- Place in Box or Crate: Place the sculpture inside a crate or a sturdy box, ensuring it is securely positioned. Use foam padding or additional bubble wrap to prevent movement.
- Secure and Label: Seal the crate or box securely with packing tape and label it with the sculpture's details and handling instructions.
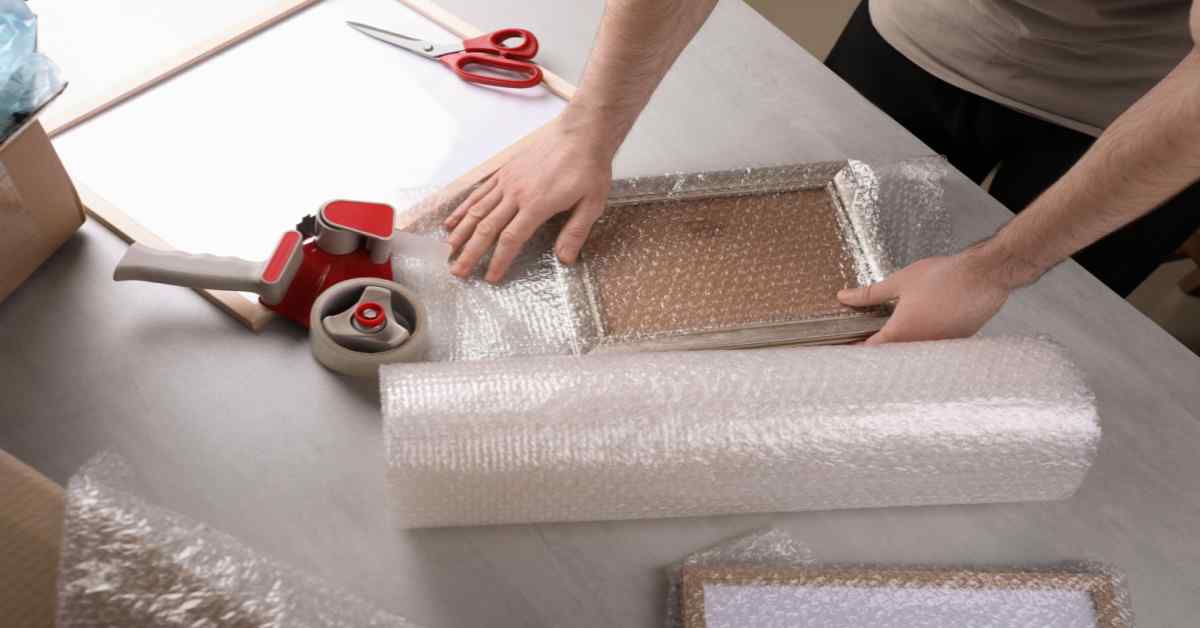
Packing Framed Prints
- Gather Materials: You'll need a photo frame packaging box or custom-sized box, acid-free tissue paper, cardboard corner protectors, bubble wrap, and packing tape.
- Clean and Document: Clean the framed print and document its condition.
- Wrap in Acid-Free Tissue Paper: Cover the framed print with acid-free tissue paper to protect the glass, frame, and the print itself.
- Add Corner Protectors: Apply cardboard corner protectors to shield the frame's corners from damage.
- Wrap in Bubble Wrap: Wrap the entire framed print in bubble wrap to provide cushioning.
- Place in Box: Carefully place the wrapped framed print in the packaging box. Ensure it's a snug fit but not overly tight.
- Label and Seal: Label the box with details and handling instructions. Seal the box securely with packing tape.
Innovative Frame Packing Ideas
- If you have multiple framed prints, consider using a custom-made cardboard divider inside the packaging box to separate and protect each piece.
- For valuable or larger framed artwork, you may want to consider a wooden crate or a reinforced packaging box for added protection.
Labelling and Documenting
Labeling and documenting your artwork is essential for a smooth move.
Labeling
- Label each artwork with the artist, title, handling instructions, and orientation.
- Consider a color-coding system for organization.
Creating an Inventory
- Use a spreadsheet with details and photos.
- Note handling instructions and value.
- Make a digital backup and have a hard copy on hand.
Best Way To Wrap A Picture Frame: NoBroker Packers And Movers
In conclusion, ensuring the safe and secure transport of your valuable artwork during a move requires meticulous planning and attention to detail. The best way to wrap a picture frame and the use of creative photo frame packaging ideas play a pivotal role in safeguarding your cherished pieces. Whether you're an art collector, homeowner, or photographer, protecting your artwork is paramount.
Proper packing and photo frame packing ideas are not just about logistics; they are a testament to the care you have for your art. NoBroker understands the value of your art and offers comprehensive guidance and services to make your relocation experience as stress-free as possible.
Your art is more than just decor; it's a reflection of your taste and passion. NoBroker is committed to ensuring that your cherished artwork arrives at your new destination in pristine condition, so you can continue to enjoy and share the beauty it brings to your life.