- https://nipponpaint.com.sg/resources/painting-articles/step-step-guide-prepping-wall-repaint/
- https://www.asianpaints.com/blogs/how-to-repaint-a-wall.html
- https://www.asianpaints.com/guides/tools.html
- https://www.livspace.com/in/magazine/painting-tools
- https://www.nobroker.in/blog/wall-painting-tools/
- https://www.birlaopus.com/blog/how-to-paint-step-by-step-guide
- https://nipponpaint.co.in/diy-wall-painting-made-easy-step-by-step-guide-for-a-stunning-home-makeover/
- https://nipponpaint.co.in/master-these-10-wall-painting-techniques-for-a-professional-finish/
- https://www.bergerpaints.com/blogs/10-steps-to-painting-walls-like-a-pro
- https://www.asianpaints.com/blogs/10-mistakes-to-avoid-while-painting-your-homes.html
- https://www.bergerpaints.com/blogs/6-mistakes-to-avoid-when-painting-home-walls
- https://www.asianpaints.com/blogs/how-often-should-i-repaint-my-house.html
- https://www.bergerpaints.com/blogs/how-often-should-you-paint-your-exterior-walls
- https://www.freshdesignblog.com/2023/09/painting-and-repainting-what-is-the-difference/
Table of Contents
Tools and Materials You Need to Repaint a Wall9 Essential Steps for Repaint the Wall and PaintingTips for a Smooth and Professional-Looking Finish Common Mistakes to Avoid When Repainting Walls How Often Should You Repaint Your Walls? Cost of Repainting a Wall in India Repainting Walls vs Fresh Painting â Whatâs the Difference? How NoBroker Helps You Repaint Your Walls Professionally?Frequently Asked Questions?
Loved what you read? Share it with others!
How to Repaint the Wall: 9 Essential Steps for a Long Lasting and Smooth Finish in 2026
Updated : January 26, 2026, 1:18 PM
Author :
![]() Jessica
Jessica
Summary
Repainting a wall requires proper preparation for a smooth, long-lasting finish. Start by cleaning the surface, removing loose paint, filling cracks, and sanding evenly. Apply a good-quality primer to help the new paint bond well. Finish with two even coats, allowing adequate drying time between layers to avoid streaks or patches. Repainting is faster and more cost-effective than fresh painting, and professional services like NoBroker help achieve a clean, flawless result with minimal effort.
Table of Contents
Tools and Materials You Need to Repaint a Wall9 Essential Steps for Repaint the Wall and PaintingTips for a Smooth and Professional-Looking Finish Common Mistakes to Avoid When Repainting Walls How Often Should You Repaint Your Walls? Cost of Repainting a Wall in India Repainting Walls vs Fresh Painting â Whatâs the Difference? How NoBroker Helps You Repaint Your Walls Professionally?Frequently Asked Questions?
Knowing how to repaint the wall is an essential skill for any homeowner looking to refresh their interiors and protect their property investment. Repainting is far more cost-effective than fresh painting, but it relies entirely on thorough surface preparation to ensure the new coat adheres properly and achieves a durable finish. This comprehensive, step-by-step guide covers everything from the necessary tools and repairing existing damage to applying the final, professional-looking coat, ensuring your project minimizes costs and maximizes longevity. [1] [2]
Tools and Materials You Need to Repaint a Wall
Before starting any repainting project, it is crucial to gather all the essential tools. [1] [3] [4] [5]
| Tool Category | Essential Items | Purpose |
|---|---|---|
| Preparation | Drop cloths, Painter's tape, Screwdriver, Plastic sheeting, Spackling paste/filler | Protecting floors/trim, removing fixtures, and repairing surfaces. |
| Cleaning | TSP (Trisodium Phosphate) or mild detergent, Water, Sponge/Damp cloth | Removing grease, dust, and grime that prevents paint adhesion. |
| Repair/Sanding | Paint scraper, Sandpaper (medium/fine grit), Sanding block | Removing peeling paint, smoothing filler, preparing the final surface. |
| Application | Paint roller, Roller cover (appropriate nap), Paint trays, Angled paintbrush (2-3 inches) | Applying paint evenly to large surfaces and "cutting in" precise edges/corners. |
9 Essential Steps for Repaint the Wall and Painting
Do not skip or rush the first five steps, as they dictate the quality of the final painted surface. [1] [2] [6] [7]
1. Clean the Wall Surface
Thoroughly clean the wall surface by wiping it down with a damp cloth to remove surface dust. For kitchens or areas exposed to smoke or high humidity, wash the walls with a soap-and-water solution or a mild cleaning agent such as TSP (Trisodium Phosphate) to remove all grease and grime.
2. Scrape Off Loose or Peeling Paint
Use a paint scraper to physically remove all old, flaking, or peeling paint chips. This is a mandatory step, as painting directly over loose paint will cause the new finish to peel and bubble immediately once it dries.
3. Repair Cracks and Holes
Fill all nail holes, minor cracks, and damaged areas with spackling paste or a wall filler compound. Allow the filler to cure completely according to the manufacturer's instructions. Overfilling slightly is acceptable, as the excess will be removed during the sanding phase.
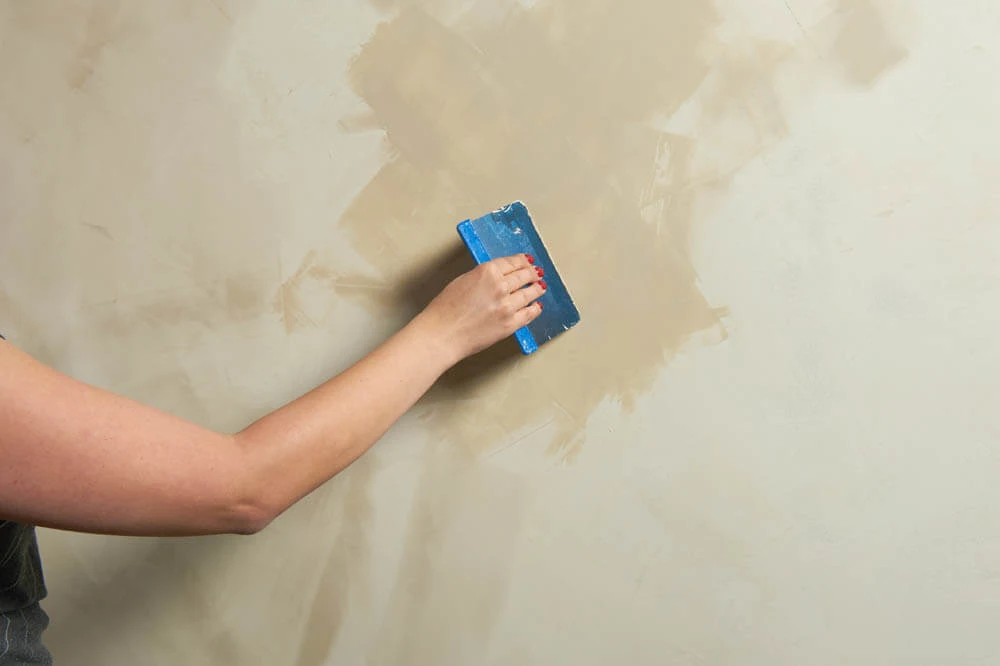
4. Sand the Wall Lightly
To achieve a seamless, professional finish, lightly sand all repaired areas until they are perfectly smooth and flush with the surrounding wall. For a highly durable finish, lightly sand the entire wall surface using a medium-to-fine grit sandpaper (120-220 grit). Follow up by wiping the entire wall down with a dry or slightly damp cloth to remove all sanding dust before proceeding.
5. Apply Primer to the Wall
Applying primer is important when changing the color dramatically (e.g., dark to light), covering significant stains, or painting over repaired areas. Primer ensures maximum adhesion of the new paint coat, provides a uniform base, and seals any porous patches. Allow the primer to dry completely according to the manufacturer's instructions before applying the color coat.
6. Start Painting With the First Coat
Use an angled paintbrush to "cut in" the paint along the edges, corners, and areas where the wall meets the ceiling and trim. Next, load a paint roller evenly, and roll the paint onto the main surface, working in small sections. Apply the paint in a "W" pattern, immediately filling it in with smooth, overlapping strokes to ensure uniform coverage.
7. Allow the Coat to Dry Completely
Rushing the painting process is a common mistake that leads to peeling and uneven texture. Check the manufacturer's directions for the recommended drying time between coats (typically 4–8 hours for water-based paint). Ensure the first coat is completely dry to the touch before proceeding, as this prevents the base layer from lifting during the second coat.
8. Apply the Second Coat
Apply the second coat using the same technique as the first. Most repainting projects require at least two full coats of paint, especially when transitioning from one color to another. Maintain a "wet edge" during the application to avoid visible roller marks or streaks.
9. Remove Tape and Clean Up
Carefully peel off all painter's tape while the final coat is still slightly wet. This helps to ensure clean, crisp lines without damaging the dried paint film. Peel the tape slowly at a 45-degree angle. Clean brushes, rollers, and paint trays immediately with soap and water (for water-based paints) or specialized solvent (for oil-based paints).
Tips for a Smooth and Professional-Looking Finish
Achieving a professional look when you repaint interior walls requires technique and precise execution. [1] [8] [9]
- Use multiple thin layers of paint rather than a single thick coat, as thick coats are prone to cracking and show an uneven texture.
- Always overlap the wet paint edge with the freshly rolled paint to avoid visible lines or streaks (flashing) on the main wall surface.
- Select a roller cover with the appropriate nap (thickness) for your wall surface; smooth walls need a shorter nap, while textured walls require a thicker nap to reach into the crevices.
- Mix all cans of the same colour into a larger container (a bucket or tray) to ensure colour consistency and avoid subtle batch variations across the wall.
- Use high-quality painter's tape and press the edges firmly to prevent paint from bleeding under the tape onto the trim.
- Remove all switch plates and outlet covers before painting, rather than taping around them, to ensure a clean, long-lasting finish.
Common Mistakes to Avoid When Repainting Walls
Skipping preparation steps is the leading cause of premature paint failure. These mistakes can ruin the finish or cause paint to peel quickly, undermining the entire project. [1] [10] [11]
- Painting over dirt, dust, or grease is the number one cause of poor adhesion, leading to peeling and flaking of the new coat shortly after application.
- Failing to apply a coat of primer over spackling paste or repaired areas results in "flashing" or visible dull spots on the final paint coat due to uneven porosity.
- Applying the second coat before the first coat is fully dry (recoat time) causes the paint to lift, crack, and adhere poorly, compromising the finish's long-term durability.
- Cheap brushes and rollers leave noticeable streaks, lint, and uneven textures, resulting in a rough, unprofessional final result.
- Dipping the roller or brush too deeply into the paint causes drips, splatters, and heavy buildup around edges and corners.
How Often Should You Repaint Your Walls?
The frequency of repainting depends significantly on the area and the type of paint used. Generally, interior walls painted with a standard washable finish (eggshell or satin) should be repainted every 5 to 7 years to maintain a fresh aesthetic and protect the substrate. High-traffic areas, such as hallways, kitchens, and children's rooms, may require repainting every 3 to 4 years due to increased wear, whereas ceilings or formal rooms may last 10 years or more. Regular maintenance and proper cleaning can dramatically extend the life of the paint. [12] [13]
Cost of Repainting a Wall in India
The cost to repaint interior walls in India is significantly lower than painting a new wall, as you save on the initial primer and the two coats of putty required for a bare plaster surface.
| Factor | Cost Range (₹/sq.ft) | Remarks |
|---|---|---|
| Basic Quality Paint | ₹12 – ₹18 | Includes basic emulsion paint and labor. |
| Standard Quality Paint | ₹18 – ₹30 | Includes washable emulsions, minor wall preparation, and labor. |
| Premium Quality Paint | ₹30 – ₹55+ | Includes high-end finishes (matte/satin) and full surface preparation/repair. |
Repainting Walls vs Fresh Painting – What’s the Difference?
The primary difference lies in the level of surface preparation required for the initial coat. [14]
| Aspect | Repainting Walls | Fresh Painting (New Walls) |
|---|---|---|
| Surface Required | Cleaning, sanding, and minor crack repair. | Cleaning, 2 coats of putty, 1 coat of specialised primer. |
| Time/Labor | Lower labour time, as only two colour coats are typically required. | Higher labour time due to extensive putty and sanding required over bare plaster. |
| Cost | 30% – 40% lower as the base preparation is already complete. | Higher due to putty and two full coats of specialised primer/sealer. |
How NoBroker Helps You Repaint Your Walls Professionally?
If the task of repainting the wall seems overwhelming, NoBroker simplifies the entire process, guaranteeing a professional, long-lasting finish. We connect you with certified, high-rated contractors who specialise in detailed surface preparation, ensuring old paint is scraped, cracks are repaired, and the surface is perfectly primed. NoBroker manages the complete project efficiently, offering transparent pricing, quality assurance on materials, and expert execution, all designed to refresh your home's look beautifully.
Frequently Asked Questions?
Q1. How do I repaint a wall at home?
Ans: To repaint a wall at home, follow four main steps: clean and sand the existing surface, repair any holes/cracks, apply primer (if needed), and finish with two smooth, even coats of paint.
Q2. Do I need primer before repainting?
Ans: You need primer before repainting if you are changing a dark color to a light one, if the wall has stains, or if you have repaired holes with spackling paste.
Q3. How many coats of paint are required?
Ans: Most repainting projects require at least two coats of the new colour to achieve a full-depth, uniform finish and sufficient coverage, especially when changing colours.
Q4. How long should I wait between coats?
Ans: You should wait for the manufacturer's recommended drying time, usually 4–8 hours for water-based emulsion paints, ensuring the first coat is completely dry before applying the second.
Q5. Can I repaint over dirty or oily walls?
Ans: No, you must never repaint over dirty, oily, or dusty walls. The surface must be thoroughly cleaned with water and a mild detergent (or TSP) to ensure the new paint adheres correctly.
Q6. How do I repair cracks before repainting?
Ans: Repair cracks by widening them slightly, cleaning out loose material, applying wall filler/spackling paste, letting it dry completely, and sanding the area smooth before priming.
Q7. Can I paint without sanding?
Ans: While you can skip sanding if the old paint is in perfect condition, lightly sanding improves adhesion and removes subtle imperfections, resulting in a smoother final finish.
Q8. What tools do I need to repaint a wall?
Ans: Essential tools include drop cloths, painter's tape, a paint scraper, spackling paste, sandpaper, primer, an angled paintbrush, and a roller with the appropriate nap.
Q9. How much does wall repainting cost in India?
Ans: The cost to repaint walls in India typically ranges from ₹18 to ₹30 per square foot for a standard washable finish, including labour and material costs.
Q10. What is the best paint finish for repainting?
Ans: The best paint finish for repainting interior walls is usually eggshell or satin, as these finishes offer durability, are washable, and mask minor wall imperfections better than a high-gloss finish.
Q11. Can NoBroker help with wall repainting services?
Ans: Yes, NoBroker provides professional wall repainting services, offering high-quality labour, verified materials, and a commitment to achieving a smooth, durable finish.
Recommended Reading
How to Repaint the Wall: 9 Essential Steps for a Long Lasting and Smooth Finish in 2026
January 26, 2026
446+ views
ARTICLE SOURCES
NoBroker Painting Tips & Color Ideas Testimonials
Before this festive season
get your house painted
Most Viewed Articles
40+ Best Stunning Two Colour Combinations for Bedroom Walls to Elevate Your Space in 2026
January 31, 2025
336696+ views
Top 25 Outside Color Combinations with Colour Codes for Indian Homes in 2026
May 16, 2025
314095+ views
Asian Paint Price 20 Litre for Different Variants in India: Coverage, Durability and Benefits
May 17, 2025
175913+ views
25 Latest Main Gate Colour Combination Ideas: Direction and Placement as Per Vastu in 2026
October 9, 2025
159382+ views
Top 26 Wall Paint Colour Combinations Ideas With Codes for Every Room in 2026
February 3, 2025
137043+ views
 Author
Loved what you read? Share it with others!
Recent blogs in
Top 8 Modern Marble Texture Wall Paint for Stylish Homes in [2026]
March 27, 2026 by Krishnanunni H M
Top 10 Light Grey Paint Colors Combination with Codes That Improve Room Appearance in [2026]
March 27, 2026 by Krishnanunni H M
Colour Psychology for Home Interiors: How to Choose Wall Colours Based on Mood
March 27, 2026 by Kruthi


 Full RM + FRM support


Join the conversation!